

Flip over a bag of store-bought dog treats and you’ll often find an ingredient list longer than your grocery receipt. Preservatives, artificial flavors, mystery protein meals — it’s enough to make any devoted dog owner put the bag back on the shelf. Making treats at home puts you fully in control of what goes into your dog’s body, and it’s far more approachable than most people expect. This guide walks you through everything: which ingredients are safe, two foolproof recipes, the most common mistakes new treat-makers make, and how to store and serve your creations so every bite counts.
Table of Contents
- What you need to know before making dog treats
- Simple homemade dog treat recipes (baked and frozen)
- Common mistakes and safety hazards to avoid
- How to serve, store, and adjust homemade dog treats
- Why not all “natural” or homemade treats are equally healthy
- Helpful resources and healthy treat upgrades
- Frequently asked questions
Key Takeaways
| Point | Details |
|---|---|
| Choose safe ingredients | Always verify ingredients are dog-safe and exclude toxic foods like xylitol and chocolate. |
| Keep treats supplemental | Limit treat portions to 10% of daily calories to maintain your dog’s healthy weight. |
| Follow simple recipes | Use easy baked or frozen recipes with clear, safe instructions for best results. |
| Store treats properly | Keep homemade treats in airtight containers or fridge for maximum freshness and safety. |
| Watch for allergies | Introduce new treats gradually and consult your vet if you see signs of intolerance. |
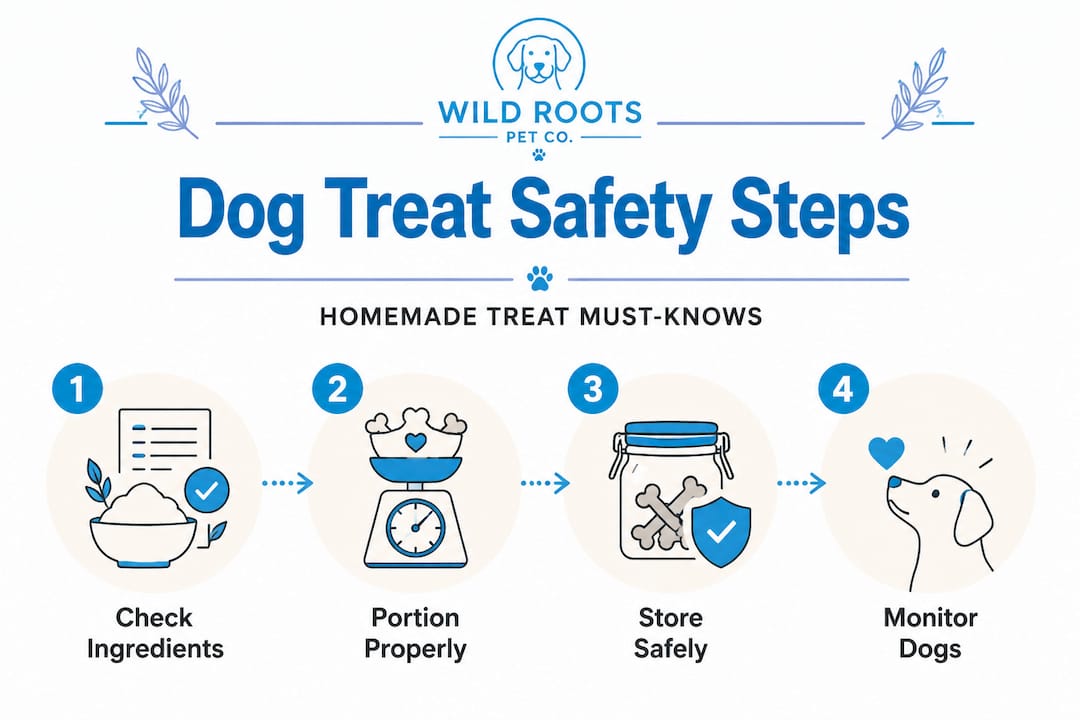
What you need to know before making dog treats
Before you preheat the oven or reach for the blender, there’s a short but critical checklist to work through. Skipping this step is where most well-intentioned dog owners run into trouble.
Ingredient quality and allergies come first. Not all dogs tolerate the same foods. Some are sensitive to grains like wheat, while others react to common proteins like chicken or beef. The AKC recommends making homemade treats as small training treats and confirming with your veterinarian if your dog has known allergies to any ingredients. A quick vet visit before you start baking can save you a lot of stress and your dog a lot of discomfort.
The 10% rule is your portion guide. Treats should be thought of as extras, not meals. Portion treats at no more than 10% of a dog’s daily caloric intake. For a 30-pound dog eating around 800 calories per day, that means treats should total no more than 80 calories. Spread that across five or six mini training treats and it adds up fast, which is why size matters as much as ingredients.
Mini-sized treats work best for training. When you’re rewarding behavior multiple times in a session, bite-sized pieces keep calories in check while still giving your dog a satisfying reward. Think thumbnail-sized for small breeds, grape-sized (without actual grapes, of course) for larger dogs.
Here’s a quick reference table for safe and unsafe ingredients:
| Category | Safe to use | Never use |
|---|---|---|
| Sweeteners | None needed | Xylitol, artificial sweeteners |
| Fruits | Blueberries, banana, apple (no seeds) | Grapes, raisins |
| Vegetables | Carrot, sweet potato, pumpkin | Garlic, onion, leeks |
| Proteins | Cooked chicken, beef, turkey, eggs | Raw dough, processed deli meat |
| Fats/Spreads | Xylitol-free peanut butter | Any spread with xylitol |
| Grains | Oats, whole wheat flour, rice flour | None specifically, but check for allergies |
| Dairy | Plain Greek yogurt (small amounts) | High-fat cheeses, flavored yogurt |
When choosing safe ingredients, think single-ingredient and minimally processed. The simpler the better. For deeper guidance on ingredient sourcing, the natural ingredient choices available for pet diets are a great starting point.
Warning: Certain common human ingredients are toxic to dogs and must never appear in homemade treats. Xylitol, chocolate, grapes, raisins, garlic, onions, macadamia nuts, and the artificial sweetener sorbitol are all dangerous. Even small amounts of some of these can cause organ failure or death.
Pro Tip: Always flip the peanut butter jar and read the full ingredient list before buying. Many “natural” and “reduced sugar” peanut butters now contain xylitol, which is lethal to dogs even in small amounts. Stick to plain, unsalted peanut butter with only one ingredient: peanuts.
Checking out healthy treat options can also help you understand what a well-formulated treat looks like before you start making your own.
Simple homemade dog treat recipes (baked and frozen)
Once you know which ingredients are safe, you’re ready to start crafting treats in your own kitchen. Here are two foolproof recipes to get you started. Neither requires professional baking skills, and both use pantry staples most dog owners already have on hand.
Classic peanut butter oat biscuits (baked)
These are the gold standard of homemade dog treats. Dogs love them. They store well. And the recipe is nearly impossible to mess up.
What you’ll need:
- 1 cup rolled oats (plain, no flavoring)
- 1/2 cup xylitol-free peanut butter
- 1 ripe banana, mashed
- 1/4 cup water (adjust as needed for dough consistency)
Step-by-step:
- Preheat your oven to 350°F and line a baking sheet with parchment paper.
- Mash the banana thoroughly in a mixing bowl until there are no large chunks remaining.
- Add the peanut butter to the banana and stir until fully combined.
- Fold in the oats and mix until a soft dough forms. Add water one tablespoon at a time if the dough feels too dry to hold together.
- Roll the dough to about 1/4-inch thickness on a lightly floured surface.
- Use a small cookie cutter or simply cut into small squares about one inch wide.
- Arrange on the baking sheet and bake for 12 to 15 minutes until the edges turn golden.
- Remove from the oven and let cool completely on a wire rack before serving. Never serve hot treats directly from the oven.
This simple baked treat method produces a firm, crunchy biscuit most dogs find irresistible. The banana adds natural sweetness without sugar, and the oats provide fiber and slow-burning energy.
Yogurt and blueberry frozen treats
Perfect for hot days or dogs who prefer a softer texture, frozen treats are the quickest option in your homemade treat toolkit.
What you’ll need:
- 1/2 cup plain Greek yogurt (unsweetened, no added fruit or flavoring)
- 1/4 cup fresh or frozen blueberries
- 1/4 cup mashed banana or pumpkin puree (plain, not pie filling)
Step-by-step:
- Blend all ingredients together until smooth.
- Pour the mixture into a silicone ice cube tray or small mold.
- Tap the tray lightly on the counter to remove air bubbles.
- Freeze for at least four hours or overnight.
- Pop the frozen treats out and store in a sealed freezer bag.
The AKC notes that frozen treats made by pouring dog-safe liquids into molds and freezing are perfectly safe when fed in moderation. The key is controlling portion size, especially for smaller breeds.
For dogs who don’t have time to wait for baking or freezing, no-bake treat ideas are worth exploring. And if you want something your dog already loves as a flavor base, peanut butter treat ideas are a great reference for what works.
| Feature | Baked biscuits | Frozen treats |
|---|---|---|
| Prep time | 10 minutes | 5 minutes |
| Total time | 25 to 30 minutes | 4+ hours (freeze time) |
| Shelf life | 1 to 2 weeks (room temp) | Up to 2 months (freezer) |
| Best for | Training, travel, daily snacks | Hot days, teething relief |
| Texture | Crunchy | Soft/frozen |
Pro Tip: Freeze baked treats in small batches of 10 to 15 at a time. Thaw only what you need for the week in the fridge. This prevents freezer burn and means you’re always pulling from a fresh batch rather than a bag that’s been open for a month.
Looking for simple flavor inspiration? Simple treat inspiration from single-ingredient turkey chews shows just how clean and effective minimal ingredients can be.
Common mistakes and safety hazards to avoid
Both baked and frozen treats are easy to make, but even simple recipes have hidden hazards. Let’s spotlight the most common mistakes and how to dodge them.
The xylitol problem is bigger than most people realize. This artificial sweetener appears in peanut butter, some yogurts, flavored nut butters, and even certain protein powders. The FDA explicitly warns that xylitol is dangerous to dogs and that peanut butter must be checked carefully. Even a small amount can trigger a dangerous drop in blood sugar (hypoglycemia) and cause liver failure. Always verify your peanut butter label says nothing more than “peanuts” and possibly “salt.”
Important: Xylitol poisoning can cause vomiting, loss of coordination, and seizures within 30 minutes of ingestion. If you suspect your dog has eaten something containing xylitol, contact your vet or the ASPCA Animal Poison Control Center immediately.
Here are the most common mistakes new treat-makers make:
- Using toxic human foods. Common human ingredients like chocolate, grapes, raisins, garlic, and onion are never safe for dogs, even in small amounts. Don’t assume that because something is healthy for you, it’s fine for your dog.
- Making treats too hard. Overbaked biscuits can become dense enough to crack teeth, especially for older dogs or small breeds. Aim for a texture that yields slightly under pressure, not a rock-hard cookie.
- Skipping portion adjustments. Adding homemade treats without reducing meal portions is a fast track to weight gain. Every treat calorie counts against your dog’s daily total.
- Using too many ingredients at once. When introducing homemade treats for the first time, stick to two or three ingredients. If a reaction occurs, you’ll know exactly what caused it.
- Ignoring freshness dates. Homemade treats have no preservatives, which means they spoil faster than commercial options. Don’t assume a treat is still good just because it looks fine.
Pro Tip: If you’re ever unsure about whether a new ingredient is safe, call your vet before you use it. A two-minute phone call is far easier than an emergency visit. For a xylitol-free peanut butter you can trust without checking the label every time, keep one specifically for dog treats in a dedicated spot in your kitchen.
For more on keeping chews and treats safe, chew safety tips are worth bookmarking.
How to serve, store, and adjust homemade dog treats
Avoiding mistakes keeps your dog safe; now make sure that serving and storing your creations preserves their taste and safety over time.
How to serve treats correctly:
- Always let baked treats cool to room temperature before offering them to your dog. Hot treats can burn the mouth and throat.
- Serve treats during or right after a training session when timing reinforces behavior most effectively.
- Supervise your dog while they eat any new treat for the first few times, watching for choking or unusual reactions.
- Break larger treats into smaller pieces for puppies, senior dogs, and small breeds.
- Never use treats to replace a meal, even if your dog skips a feeding.
Safe storage guidelines:
- Store baked treats in an airtight container at room temperature for up to one week, or refrigerate to extend shelf life to two weeks.
- Freeze baked treats in a zip-seal bag with as much air removed as possible. They’ll keep for up to two months.
- Keep frozen treats in a sealed container in the freezer and pull out only what you’ll use within 24 hours.
- Label all containers with the date you made the batch so you never guess at freshness.
- Refrigerate any treat made with dairy, eggs, or meat. These spoil faster at room temperature.
The AKC recommends feeding treats in moderation and adjusting daily calories accordingly. Homemade treats are not nutritionally complete on their own, and keeping treats supplemental while adjusting main meal portions prevents excess weight gain over time.
If your dog shows signs of digestive upset after a new treat (loose stool, vomiting, gas), stop offering that treat immediately and give their system 24 to 48 hours to settle. Talk to your vet if symptoms persist. For ongoing guidance on building a well-rounded treat routine, additional treat guidance provides helpful context.
Why not all “natural” or homemade treats are equally healthy
Here’s something most homemade dog treat content won’t tell you directly: the word “homemade” can lull dog owners into a false sense of security. We’ve seen it happen. Someone spends an afternoon in the kitchen, uses real bananas and organic oats, and assumes the treats are automatically superior to anything sold in a store. But healthy intentions don’t guarantee a healthy outcome.
The real issue is that what “natural” really means in pet nutrition is nuanced. A treat can contain entirely natural ingredients and still cause problems. Too much fat from peanut butter can trigger pancreatitis in susceptible dogs. An overly firm biscuit can fracture a tooth. Plain yogurt is fine in small amounts but can cause digestive issues in lactose-sensitive dogs. These are not hypothetical risks. They’re real, documented problems that happen to real dogs whose owners were trying to do the right thing.
Portion control is where most homemade treat routines quietly fall apart. It’s easy to justify “just one more” when you made the treats yourself and know there’s nothing artificial in them. But calories from whole food ingredients add up just as fast as calories from anything else. A dog who gets six peanut butter biscuits a day is likely getting too much fat regardless of how clean the recipe is.
The most effective homemade treat routine is one built on current knowledge, not just good intentions. That means checking labels every time you buy an ingredient (formulas change), revisiting portion guidelines as your dog’s weight shifts, and staying open to the possibility that your dog’s needs may evolve. Homemade is genuinely better when done thoughtfully. But it requires ongoing attention, not just a one-time recipe commitment.
Not all DIY treats are automatically safe or nutritious. The responsibility of ingredient selection, portion control, and texture appropriateness falls entirely on you. That’s not a reason to avoid making treats — it’s a reason to take it seriously and enjoy the process with clear eyes.
Helpful resources and healthy treat upgrades
Whether you’re just getting started or you want to take your dog’s treat routine to the next level, having the right tools and products on hand makes a real difference. At Wild Roots Pet, we’ve built our entire product line around the same principle behind homemade treats: real ingredients, no shortcuts, nothing your dog doesn’t need.

If you want to skip the guesswork on peanut butter safety, our xylitol-free peanut butter is formulated specifically for dogs, made in the USA, and contains flaxseed for added omega support. For busy days when homemade isn’t an option, our training and travel treats are single-ingredient, portable, and perfectly portioned. And if you want to go deeper into holistic pet nutrition, the holistic pet health toolkit is a comprehensive wellness resource built for pet parents who want to understand the full picture.
Frequently asked questions
How many homemade treats can my dog have per day?
Treats should make up no more than 10% of your dog’s daily calorie intake. Use your dog’s total daily calorie target as your guide and track treat calories the same way you track meal calories.
Can I use peanut butter in all dog treat recipes?
Yes, but xylitol is lethal to dogs and many peanut butters now contain it. Always check the ingredient label and use only plain, xylitol-free peanut butter in every recipe.
What are the most dangerous ingredients for dogs in homemade treats?
The highest-risk ingredients include chocolate, xylitol, grapes, raisins, garlic, and onions. These common human ingredients should never appear in homemade dog treats in any quantity.
How can I tell if my dog is allergic to a homemade treat ingredient?
Introduce new ingredients one at a time and watch for itching, digestive upset, or changes in stool. The AKC recommends confirming with your veterinarian if your dog has known allergies or shows any reaction to a new ingredient.